In this document
See also
Video
What's New in Android Developer Tools
The Android Studio build system is the toolkit you use to build, test, run and package your apps. The build system is independent from Android Studio, so you can invoke it from Android Studio or from the command line. After you write your application, you can use the features of the build system to:
- Customize, configure, and extend the build process.
- Create multiple APKs for your app with different features using the same project.
- Reuse code and resources.
The flexibility of the Android Studio build system enables you to achieve all of this without modifying your app's core project files.
Overview of the Build System
The Android Studio build system consists of an Android plugin for Gradle. Gradle is an advanced build toolkit that manages dependencies and allows you to define custom build logic. Many software projects use Gradle to manage their builds. The Android plugin for Gradle does not depend on Android Studio, although Android Studio is fully integrated with it. This means that:
- You can build your Android apps from the command line on your machine or on machines where Android Studio is not installed (such as continuous integration servers).
- You can build your Android apps from Android Studio with the same custom build configuration and logic as when you build from the command line.
The output of the build is the same whether you are building a project from the command line, on a remote machine, or using Android Studio.
Build configuration
The build configuration for your project is defined inside Gradle build files, which are plain text files that use the syntax and options from Gradle and the Android plugin to configure the following aspects of your build:
- Build variants. The build system can generate multiple APKs with different configurations for the same project. This is useful when you want to build different versions of your application without having to create a separate project for each of them.
- Dependencies. The build system manages project dependencies and supports dependencies from your local filesystem and from remote repositories. This prevents you from having to search, download, and copy binary packages for your dependencies into your project directory.
- Manifest entries. The build system enables you to specify values for some elements of the manifest file in the build configuration. These new values override the existing values in the manifest file. This is useful if you want to generate multiple APKs for your project where each of them has a different package name, minimum SDK version, or target SDK version.
- Signing. The build system enables you to specify signing settings in the build configuration, and it can sign your APKs during the build process.
- ProGuard. The build system enables you to specify a different ProGuard rules file for each build variant. The build system can run ProGuard to obfuscate your classes during the build process.
- Testing. The build system generates a test APK from the test sources in your project, so you do not have to create a separate test project. The build system can run your tests during the build process.
Gradle build files use Groovy syntax. Groovy is a dynamic language that you can use to define custom build logic and to interact with the Android-specific elements provided by the Android plugin for Gradle.
Build by convention
The Android Studio build system assumes sensible defaults for the project structure and other build options. If your project adheres to these conventions, your Gradle build files are very simple. When some these conventions do not apply to your project, the flexibility of the build system allows you to configure almost every aspect of the build process. For example, if the sources for your project are located in a different directory than the default, you can specify this location in the build file.
Projects and modules
A project in Android Studio represents a complete Android app. Android Studio projects consist of one or more modules. A module is a component of your app that you can build, test, or debug independently. Modules contain the source code and resources for your app. Android Studio projects contain three kinds of modules:
- Java library modules contain reusable code. The build system generates a JAR package for Java library modules.
- Android library modules contain reusable Android-specific code and resources. The build system generates an AAR (Android ARchive) package for library modules.
- Android application modules contain application code and may depend on library modules, although many Android apps consists of only one application module. The build system generates an APK package for application modules.
Android Studio projects contain a top-level Gradle build file that lists all the modules in the project, and each module contains its own Gradle build file.
Dependencies
The Android Studio build system manages project dependencies and supports module dependencies, local binary dependencies, and remote binary dependencies.
- Module Dependencies
A project module can include in its build file a list of other modules it depends on. When you build this module, the build system assembles and includes the required modules.
- Local Dependencies
If you have binary archives in your local filesystem that a module depends on, such as JAR files, you can declare these dependencies in the build file for that module.
- Remote Dependencies
When some of your dependencies are available in a remote repository, you do not have to download them and copy them into your project. The Android Studio build system supports remote Maven dependencies. Maven is a popular software project management tool that helps organize project dependencies using repositories.
Many popular software libraries and tools are available in public Maven repositories. For these dependencies you only have to specify their Maven coordinates, which uniquely identify each element in a remote repository. The format for Maven coordinates used in the build system is
group:name:version. For example, the Maven coordinates for version 16.0.1 of the Google Guava libraries arecom.google.guava:guava:16.0.1.The Maven Central Repository is widely used to distribute many libraries and tools.
Build tasks
The Android Studio build system defines a hierarchical set of build tasks: the top-level tasks invoke the tasks they depend on to produce the necessary outcomes. The build system provides project tasks to build your app and module tasks to build modules independently.
You can view the list of available tasks and invoke any task from Android Studio and from the command line, as described in Build the project in Android Studio and and Build the project from the command line.
The Gradle wrapper
Android Studio projects contain the Gradle wrapper, which consists of:
- A JAR file
- A properties file
- A shell script for Windows platforms
- A shell script for Mac and Linux platforms
Note: You should submit all of these files to your source control system.
Using the Gradle wrapper (instead of the local Gradle installation) ensures that you always run the version of Gradle defined in the properties file. To configure your project to use a newer version of Gradle, edit the properties file and specify the new version there.
Android Studio reads the properties file from the Gradle wrapper directory inside your project and runs the wrapper from this directory, so you can seamlessly work with multiple projects that require different versions of Gradle.
Note: Android Studio does not use the shell scripts, so any changes you make to them won't work when building from the IDE. You should define your custom logic inside Gradle build files instead.
You can run the shell scripts to build your project from the command line on your development machine and on other machines where Android Studio is not installed.
Create and Build an Android Studio Project
This section builds on the concepts presented above and shows you how to:
- Create projects and modules.
- Work with the project structure.
- Edit build files to configure the build process.
- Build and run your app.
Create a project in Android Studio
To create a new project in Android Studio:
- Click File and select New Project.
- In the window that appears, enter "BuildSystemExample" in the Application name field.
- Leave the rest of the values unchanged and click Next.
- Leave the default icon settings unchanged and click Next.
- Select Blank Activity and click Next.
- Leave the default activity and layout names unchanged and click Finish.
Figure 1 shows how the Android Studio window looks like after creating the project.
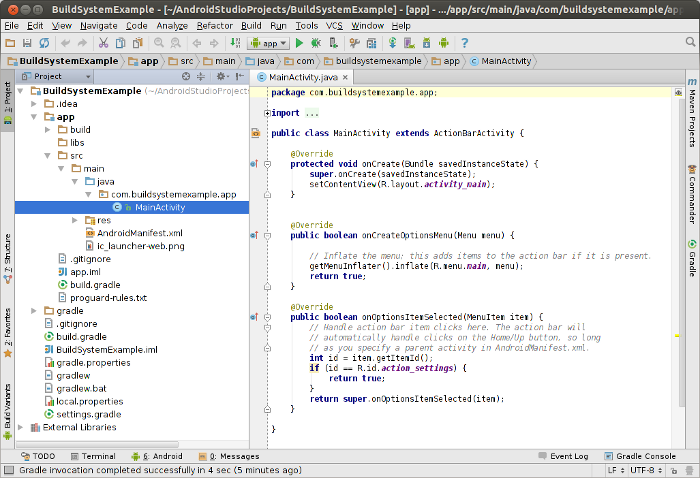
Figure 1. Previewing your app.
The project structure
Android Studio projects contain an application module by default (app).
Table 1 lists where the main components of your app are located inside this module.
Table 1. Default location of the components in an application module.
| Component | Location |
|---|---|
| Source files | app/src/main/java/<package>/ |
| Resource files | app/src/main/res/ |
| Manifest file | app/src/main/AndroidManifest.xml |
| Build file | app/build.gradle |
When you add additional modules to your project, the directory structure for each module is
similar to the one shown in table 1, replacing app by the name of the module.
Add a library module
This section shows you how to add a library module to your project and how to add this library as a dependency of an application module.
Create a new library module
It is good development practice to group functionality that you may reuse in other apps inside
a library module. To create a library module inside the BuildSystemExample
project:
- Click File and select New Module.
- On the window that appears, select Android Library and click Next.
- Leave the default module name (
lib) unchanged and click Next. - Select Blank Activity and click Next.
- Type "LibActivity1" on the Activity Name field and click Finish.
The project now contains two modules, app and lib, with one activity
in each module.
Open an activity from a library module
Library modules contain activities and other logic that one or more application modules reuse.
In this example, MainActivity in the app module opens LibActivity1
from the lib module. To open LibActivity1 from
MainActivity:
-
Edit the layout file for
MainActivityin theappmodule. This file is located inapp/src/main/res/layout/activity_main.xml. Replace the contents of this file with the following:<LinearLayout xmlns:android="http://schemas.android.com/apk/res/android" xmlns:tools="http://schemas.android.com/tools" android:layout_width="match_parent" android:layout_height="match_parent" tools:context="com.buildsystemexample.app.MainActivity"> <Button android:id="@+id/button1" android:layout_width="wrap_content" android:layout_height="wrap_content" android:text="@string/button1" android:onClick="onButton1Clicked"/> </LinearLayout> -
In this layout file, click on the line that contains
android:text="@string/button1"and press Alt+Enter. Follow the suggestion from Android Studio to add a string resource with the value "Open LibActivity1". -
In this layout file, click on the line that contains
android:onClick="onButton1Clicked"and press Alt+Enter. Follow the suggestion from Android Studio to add theonButton1Clickedmethod toMainActivity. -
Copy the following code inside the
onButton1Clickedmethod inMainActivity:public void onButton1Clicked(View view) { Intent intent = new Intent(this, LibActivity1.class); startActivity(intent); } -
Click on
LibActivity1in the first line inside theonButton1Clickedmethod ofMainActivityand press Alt+Enter. Follow the suggestion from Android Studio to add an import forLibActivity1from the lib module.
When the user taps the Open LibActivity1 button on MainActivity
(from the app module), LibActivity1 (from the lib module)
starts.
Add a dependency on a library module
The app module now depends on the lib module, but the build system
does not know about this yet. Edit the build file for the app module (
app/build.gradle) and add a dependency on the lib module:
...
dependencies {
    ...
    compile project(":lib")
}
The lib module can still be built and tested independently, and the build system
creates an AAR package for it that you could reuse in other projects.
Build the project in Android Studio
To build the project on Android Studio, click Build and select Make Project. The status bar at the bottom of the window shows the current progress of the build:
Gradle: Executing tasks: [:app:assembleDebug, :lib:bundleDebug]
If your project uses product flavors, Android Studio invokes the task for the selected build variant. For more information, see Work with build variants.
Click  on the bottom
right part of the window to show the Gradle Console, as shown in figure 2.
on the bottom
right part of the window to show the Gradle Console, as shown in figure 2.
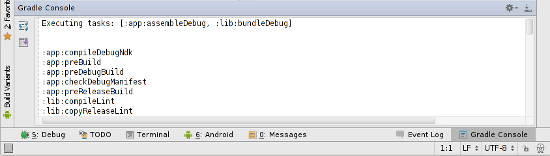
Figure 2. The Gradle Console in Android Studio.
The Gradle Console shows the build tasks and subtasks that the build system runs for
Android Studio. If the build fails, you can find more details on the console. To hide the Gradle
Console, click again.
To view the list of all available build tasks in Android Studio, click Gradle on the right side of the IDE window. The Gradle tasks panel appears as shown in figure 3. Double-click any build task to run it in Android Studio. To hide the Gradle tasks panel, click Gradle again.
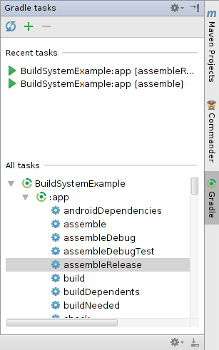
Figure 3. The list of build tasks in Android Studio.
Build the project from the command line
To build the project from the command line, open a terminal window and navigate to the project root. On Windows platforms, type this command:
> gradlew.bat assembleDebug
On Mac OS and Linux platforms, type these commands:
$ chmod +x gradlew
$ ./gradlew assembleDebug
The first command (chmod) adds the execution permission to the Gradle wrapper
script and is only necessary the first time you build this project from the command line.
The output of gradlew is similar to the output in the Gradle Console from
figure 2.
The assembleDebug build task builds the debug version of your app and signs it
with the default local certificate, so that you can install it on the emulator and on real devices
for debugging purposes.
After you build the project, the output APK for the app module is located in
app/build/apk/, and the output AAR for the lib module is located in
lib/build/libs/.
To see a list of all available build tasks for your project, type this command:
$ ./gradlew tasks
Build a release version
You can build the release version of your application from the command line or using Android
Studio. To build it from the command line, invoke the assembleRelease build task using
the Gradle wrapper script (gradlew assembleRelease). To build it from Android
Studio:
- Click Gradle on the right side of the IDE window.
- On the All tasks section of the sidebar that appears, expand BuildSystemExample.
- Expand :app and double-click assembleRelease.
You can use this procedure to invoke any build task from Android Studio.
Configure the Build
This section uses the BuildSystemExample project from the previous section and
shows you how to:
- Use the syntax from the Android plugin for Gradle in build files.
- Declare dependencies.
- Configure ProGuard settings.
- Configure signing settings.
- Work with build variants.
Build file basics
Android Studio projects contain a top-level build file and a build file for each module. The
build files are called build.gradle, and they are plain text files that use
Groovy syntax to configure the build with the elements
provided by the Android plugin for Gradle. In most cases, you only need to edit the build files
at the module level. For example, the build file for the app module in the
BuildSystemExample project looks like this:
apply plugin: 'android'

android {
    compileSdkVersion 19
    buildToolsVersion "19.0.0"

    defaultConfig {
        minSdkVersion 8
        targetSdkVersion 19
        versionCode 1
        versionName "1.0"
    }
    buildTypes {
        release {
            runProguard true
            proguardFiles getDefaultProguardFile('proguard-android.txt'), \
            'proguard-rules.txt'
        }
    }
}

dependencies {
    compile project(":lib")
    compile 'com.android.support:appcompat-v7:19.0.1'
    compile fileTree(dir: 'libs', include: ['*.jar'])
}
apply plugin: 'android' applies the Android plugin for Gradle to this build.
This adds Android-specific build tasks to the top-level build tasks and makes the
android {...} element available to specify Android-specific build options.
android {...} configures all the Android-specific build options:
- The
compileSdkVersionproperty specifies the compilation target. The
buildToolsVersionproperty specifies what version of the build tools to use. To install several versions of the build tools, use the SDK Manager.Note: Always use a build tools version whose major revision number is higher or equal to that of your compilation target and target SDK.
The
defaultConfigelement configures core settings and entries in the manifest file (AndroidManifest.xml) dynamically from the build system. The values indefaultConfigoverride those in the manifest file.The configuration specified in the
defaultConfigelement applies to all build variants, unless the configuration for a build variant overrides some of these values.- The
buildTypeselement controls how to build and package your app. By default, the build system defines two build types: debug and release. The debug build type includes debugging symbols and is signed with the debug key. The release build type is not signed by default. In this example the build file configures the release version to use ProGuard.
The dependencies element is outside and after the android element.
This element declares the dependencies for this module. Dependencies are covered in the following
sections.
Note: When you make changes to the build files in your project, Android Studio requires a project sync to import the build configuration changes. Click Sync Now on the yellow notification bar that appears for Android Studio to import the changes.

Figure 4. Sync the project in Android Studio.
Declare dependencies
The app module in BuildSystemExample declares three
dependencies:
...
dependencies {
    // Module dependency
    compile project(":lib")

    // Remote binary dependency
    compile 'com.android.support:appcompat-v7:19.0.1'

    // Local binary dependency
    compile fileTree(dir: 'libs', include: ['*.jar'])
}
Each of these dependencies is described below. The build system adds all the
compile dependencies to the compilation classpath and includes them in the final
package.
Module dependencies
The app module depends on the lib module, because
MainActivity launches LibActivity1 as described in
Open an Activity from a Library Module.
compile project(":lib") declares a dependency on the lib
module of BuildSystemExample. When you build the app module,
the build system assembles and includes the lib module.
Remote binary dependencies
The app and lib modules both use the ActionBarActivity
class from the Android Support Library, so these modules depend on it.
compile 'com.android.support:appcompat-v7:19.0.1' declares a dependency on
version 19.0.1 of the Android Support Library by specifying its Maven coordinates. The Android Support
Library is available in the Android Repository package of the Android SDK. If your
SDK installation does not have this package, download and install it using the SDK Manager.
Local binary dependencies
The modules in BuildSystemExample do not use any binary dependencies from the
local file system. If you have modules that require local binary dependencies, copy the JAR
files for these dependencies into <moduleName>/libs inside your project.
compile fileTree(dir: 'libs', include: ['*.jar']) tells the build system that any
JAR file inside app/libs is a dependency and should be included in the compilation
classpath and in the final package.
For more information about dependencies in Gradle, see Dependency Management Basics in the Gradle User Guide.
Run ProGuard
The build system can run
ProGuard to obfuscate your
classes during the build process. In BuildSystemExample, modify the build file for
the app module to run ProGuard for the release build:
...
android {
    ...
    buildTypes {
        release {
            runProguard true
            proguardFiles getDefaultProguardFile('proguard-android.txt'), \
                          'proguard-rules.txt'
        }
    }
}
...
getDefaultProguardFile('proguard-android.txt') obtains the default ProGuard
settings from the Android SDK installation. Android Studio adds the module-specific rules file
proguard-rules.txt at the root of the module, where you can add custom ProGuard
rules.
Configure signing settings
The debug and the release versions of the app differ on whether the application can be debugged on secure devices and on how the APK is signed. The build system signs the debug version with a default key and certificate using known credentials to avoid a password prompt at build time. The build system does not sign the release version unless you explicitly define a signing configuration for this build.
To sign the release version of BuildSystemExample:
Copy your release key to the root directory of the
appmodule (app/).This ensures that the build system can find your key when you move the location of your project or when you build the project on a different machine. If you do not have a release key, you can generate one as described in Signing your Applications.
Add the signing configuration to the build file for the
appmodule:... android { ... defaultConfig { ... } signingConfigs { release { storeFile file("myreleasekey.keystore") storePassword "password" keyAlias "MyReleaseKey" keyPassword "password" } } buildTypes { release { ... signingConfig signingConfigs.release } } } ...- Invoke the
assembleReleasebuild task from Android Studio or from the command line.
The package in app/build/apk/app-release.apk is now signed with your release key.
Note: Including the passwords for your release key and keystore inside the build file is not a good security practice. Alternatively, you can configure the build file to obtain these passwords from environment variables or have the build process prompt you for these passwords.
To obtain these passwords from environment variables:
storePassword System.getenv("KSTOREPWD")
keyPassword System.getenv("KEYPWD")
To have the build process prompt you for these passwords if you are invoking the build from the command line:
storePassword System.console().readLine("\nKeystore password: ")
keyPassword System.console().readLIne("\nKey password: ")
Work with build variants
This section describes how the build system can help you create different versions of the same application from a single project. This is useful when you have a demo version and a paid version of your app, or if you want to distribute multiple APKs for different device configurations on Google Play.
The build system uses product flavors to create different versions of your app. Each version of your app can have different features or device requirements. The build system generates a different APK for each version of your app.
Build variants
Each version of your app is represented in the build system by a build variant. Build variants are combinations of build types and product flavor configurations. Android Studio projects define two build types (debug and release) and no product flavors by default. These projects consists of two build variants, debug and release, and the build system generates an APK for each.
The exercise in this section defines two product flavors, demo and full. This generates four build variants:
- demo-debug
- demo-release
- full-debug
- full-release
In this case the build system creates four APKs, one for each of these build variants.
Some projects have complex combinations of features along more than one dimension, but they still represent the same app. For example, in addition to having a demo and a full version of the app, some games may contain binaries specific to a particular CPU/ABI. The flexibility of the build system makes it possible to generate the following build variants for such a project:
- x86-demo-debug
- x86-demo-release
- x86-full-debug
- x86-full-release
- arm-demo-debug
- arm-demo-release
- arm-full-debug
- arm-full-release
- mips-demo-debug
- mips-demo-release
- mips-full-debug
- mips-full-release
This project would consist of two build types (debug and release) and two dimensions of product flavors, one for app type (demo or full) and one for CPU/ABI (x86, ARM, or MIPS). For more information on flavor dimensions, see the Gradle Plugin User Guide.
Source directories
To build each version of your app, the build system combines source code and resources from:
src/main/- the main source directory (common to all variants)src/<buildType>/- the build type source directorysrc/<flavorName>/- the flavor source directory
The number of flavor source directories used in the build depends on the flavor configuration of your project:
For projects that do not define any flavors, the build system does not use any flavor source directories. For example, to generate the release build variant in projects with no flavors, the build system uses:
src/main/src/release/(build type)
For projects that define a set of flavors, the build system uses one flavor source directory. For example, to generate the full-debug build variant in the example in this section, the build system uses:
src/main/src/debug/(build type)src/full/(flavor)
For projects that use flavor dimensions, the build system uses one flavor source directory per dimension. For example, to generate the arm-demo-release build variant in the previous example, the build system uses:
src/main/src/release/(build type)src/demo/(flavor - app type dimension)src/arm/(flavor - ABI dimension)
Note: The build type and flavor source directories are optional, and Android Studio does not create these directories for you. The build system does not use them if they are not present.
The source code from these directories is used together to generate the output for a build variant. You can have classes with the same name in different directories as long as those directories are not used together in the same variant. The exercise in this section shows you how to create different versions of the same activity class in different variants.
The build system merges all the manifests into a single manifest, so each build variant can define different components or permissions in the final manifest.
The build system merges all the resources from the all the source directories. If different folders contain resources with the same name for a build variant, the priority order is the following: build type resources override those from the product flavor, which override the resources in the main source directory.
Note: Build variants enable you to reuse common activities, application logic, and resources across different versions of your app.
Product flavors in BuildSystemExample
To create different versions of your app:
- Define product flavors in the build file.
- Create additional source directories for each flavor.
- Add the flavor-specific sources to your project.
The rest of this section walks you through these steps in detail using the
BuildSystemExample project. You create two flavors of the
BuildSystemExample app, a demo flavor and a full flavor. Both flavors share
MainActivity, to which you add a new button to launch a new activity,
SecondActivity. This new activity is different for each flavor, so you simulate a
situation where the new activity would have more features in the full flavor than in the demo
flavor. At the end of the exercise, you end up with two different APKs, one for each flavor.
Define product flavors in the build file
To define two product flavors, edit the build file for the app module to add the following configuration:
...
android {
    ...
    defaultConfig { ... }
    signingConfigs { ... }
    buildTypes { ... }
    productFlavors {
        demo {
            packageName "com.buildsystemexample.app.demo"
            versionName "1.0-demo"
        }
        full {
            packageName "com.buildsystemexample.app.full"
            versionName "1.0-full"
        }
    }
}
...
The product flavor definitions support the same properties as the defaultConfig
element. The base configuration for all flavors is specified in defaultConfig, and each
flavor can override any value. The build file above assigns a different package name to each flavor:
since each flavor definition creates a different app, they each need a distinct package name.
Note: To distribute your app using
Multiple APK Support in
Google Play, assign the same package name to all variants and give each variant a different
versionCode. To distribute different variants of your app as separate apps in Google
Play, assign a different package name to each variant.
Add additional source directories for each flavor
Now you create source folders and add a SecondActivity to each flavor. To create
the source directory structure for the demo flavor:
- On the Project panel, expand BuildSystemExample, and then expand the app directory.
- Right click the src directory under app and select New > Directory.
- Enter "demo" as the name of the new directory and click OK.
Similarly, create the following directories:
app/src/demo/javaapp/src/demo/resapp/src/demo/res/layoutapp/src/demo/res/values
The resulting directory structure looks like figure 5.
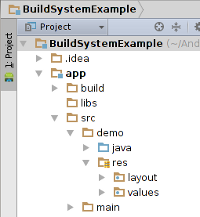
Figure 5. New source directories for the demo flavor.
Add a new activity to each flavor
To add SecondActivity to the demo flavor:
- On the Project panel, right click on the app module and select New > Activity.
- Select Blank Activity and click Next.
- Enter "SecondActivity" as the activity name.
- Enter "com.buildsystemexample.app" as the package name and click Finish.
- Right click on the java directory under app/src/demo and select New > Package.
- Enter "com.buildsystemexample.app" as the package name and click OK.
- Drag SecondActivity and drop it under the new package in app/src/demo/java.
- Accept the default values and click Refactor.
To add the layout for SecondActivity and a strings resource to the demo flavor:
- Drag activity_second.xml from app/src/main/res/layout and drop it inside app/src/demo/res/layout.
- Accept the default values on the window that appears and click
OK. - Copy strings.xml from app/src/main/res into app/src/demo/res.
Replace the contents of the new copy of
strings.xmlwith the following:<?xml version="1.0" encoding="utf-8"?> <resources> <string name="hello_world">Demo version only.</string> </resources>
Now you add source folders and SecondActivity to the full flavor by making a copy
of the demo flavor:
- On the Project panel, right click on the demo directory under app/src and select Copy.
- Right-click on the src/ directory under app/ and select Paste.
- On the window that appears, enter "full" as the new name and click OK.
Replace the contents of strings.xml under src/full/res/values with the following:
<?xml version="1.0" encoding="utf-8"?>
<resources>
    <string name="hello_world">This is the full version!</string>
</resources>
Note: From this point on, you could develop
SecondActivity independently inside each
flavor. You can add more features to this activity in the full flavor.
To work on files from a particular flavor, click on Build Variants on the left of the IDE window and select the flavor you want to modify in the Build Variants panel, as shown in figure 5. Android Studio may show errors in source files from flavors other than the one selected in the Build Variants panel, but this does not affect the outcome of the build.
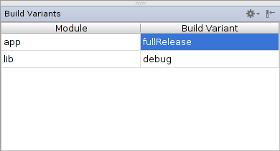
Figure 6. The Build Variants panel.
Launch a flavor-specific activity from the main activity
Since the flavor-specific activity (SecondActivity) has the same package name and
activity name in both flavors, you can launch it from the main activity, which is common to all
flavors. To modify the main activity:
Edit
activity_main.xmland add a new button toMainActivity:<LinearLayout ...> ... <Button android:id="@+id/button2" android:layout_width="wrap_content" android:layout_height="wrap_content" android:text="@string/button2" android:onClick="onButton2Clicked"/> </LinearLayout>- Click on the areas marked in red in the layout file and press Alt+
Enter. Follow the suggestions from Android Studio to add a new string
resource with value “Open Second Activity” and an
onButton2Clickedmethod toMainActivity. Add the following code to the
onButton2Clickedmethod ofMainActivity:public void onButton2Clicked(View view) { Intent intent = new Intent(this, SecondActivity.class); startActivity(intent); }Edit the app's manifest to include a reference to
SecondActivity:<manifest ...> <application ...> ... <activity android:name="com.buildsystemexample.app.SecondActivity" android:label="@string/title_activity_second" > </activity> </application> </manifest>
Build output
The BuildSystemExample app is now complete. To build it, invoke the
assemble task from Android Studio or from the command line.
The build generates an APK for each build variant:
the app/build/apk/ directory contains packages named
app-<flavor>-<buildtype>.apk; for example, app-full-release.apk and
app-demo-debug.apk.
Reference
The build system is very flexible and has more features than those described here. For a complete reference, see the Android Plugin for Gradle User Guide.